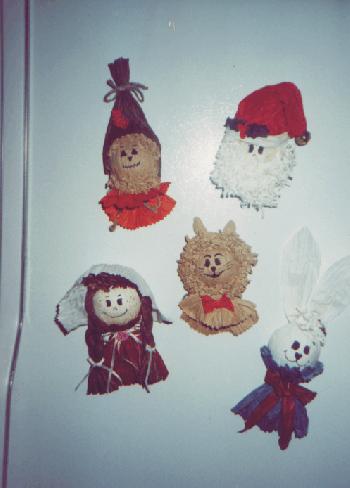
My Kind Of People
GETTING STARTED
HEAD: For each character’s head you will need 1/2 of a 2-1/2″ sytrofoam ball and 6″ of 4-1/2″ wide Am-Twist®. Untwist the paper and cover the rounded side of the half ball making it as smooth as possible. Glue sides, then ends of the paper to the flat side of the half ball.
CRIMP N’ CURL
Untwist and then fold your Am-Twist® in half lengthwise. Cut the paper along the fold. Keeping one piece on top of the other, fold sheets in half lengthwise again. Staple along the length near the fold to keep the paper in place. Starting at one end, cut slits along the open edge of the paper, much like a comb. Be sure that you do not cut the slits through the fold/stapled edge. Continue cutting these slits to the other end of the paper. Now fold the paper end to end and fluff.
DOLL
6″ of 4-1/2″ wide Ivory Am-Twist®
20″ of 4-1/2″ wide Chocolate Brown Am-Twist®
8″ of 4-1/2″ wide White Am-Twist®
10″ of 4-1/2″ wide Burgundy Am-Twist®
1 yard silk ribbon 1/8″ wide
1 small silk rose
1/2 of a 2-1/2″ styrofoam ball
1 – 2″ x 2″ magnet
Glue gun and glue
INSTRUCTIONS: Cover the half Styrofoam ball with the ivory paper (see getting started). Cut a 14″ piece of chocolate brown paper and untwist. Cut the chocolate brown into 3 equal strips lengthwise. Leaving about one inch on each end, loosely braid the 3 pieces. Tie the ends with a bow using the 1/8″ silk ribbon. Glue the braid across the top of the head forming a braid down each side. Untwist the remaining chocolate brown paper to make bangs (see crimp n’ curl above). Glue bangs to the head. Untwist the white paper and cut in half making two 4″ pieces. Glue these two pieces together side by side. Gather and glue one end of the paper to the back of her head so the open end surrounds the doll’s face creating a bonnet. For the dress, untwist the burgundy paper and cut the paper in half making two 5″ pieces. Glue the two 5″ pieces together side by side. Gather one end an inch or so down and tie a bow with a piece of the 1/8″ silk ribbon. Ass a small silk rose to the center of the bow. Glue the dress to the head at the collar Using a fine tip felt marker create your doll’s face and expression. Glue magnet to the back.
SANTA
6″ of 4-1/2″ wide Ivory Am-Twist®
36″ of 4-1/2″ wide White Am-Twist®
3″ of 4-1/2″ wide Kelly Green Am-Twist®
12″ of 4-1/2″ wide Red Am-Twist®
1 Jingle Bell (12mm)
1 – 2″ x 2″ magnet
1/2 of a 2-1/2″ Styrofoam ball
Glue gun and glue
INSTRUCTIONS: Cover the 1/2 Styrofoam ball with the ivory paper (see getting started). For Santa’s hat untwist the red paper and cut in half. Place one piece on top of the other and glue both ends forming a cylinder. Slide one end of the hat over the head and glue. Gather the other end and glue at edge. Glue the jingle bell to the gathered end. Fold the hat at the middle and down towards the front. Cut a piece of white paper about 9″ long. Loosen the twist and glue paper around the bottom of the hat for trim. For Santa’s beard, untwist the remaining white paper. Cut the piece in half, then lay one piece on top of the other and follow the crimp n’ curl instructions above. Glue the beard to his face. Using a fine point marker, draw in his face. Untwist and cut holly leaves from the kelly green. Berries may be cut from scraps of red. Glue magnet to back.
SCARECROW
24″ of 4-1/2″ wide Natural Am-Twist®
8″ of 4-1/2″ wide Orange Am-Twist®
12″ of 4-1/2″ wide Chocolate Brown Am-Twist®
2″ of 4-1/2″ wide Black Am-Twist®
1 yard just or yarn
1/2 of a 2-1/2″ Styrofoam ball
1 – 2″ x 2″ magnet
Glue gun and Glue
INSTRUCTIONS: Cover the 1/2 Styrofoam ball with an untwisted 6″ piece of natural paper (see getting started). For the scarecrow’s hair and trim cut an 8″ piece of natural paper and a 10″ piece of natural. Untwist both pieces and follow the crimp n’ curl instructions above. Glue both pieces to the top and bottom of the head. Untwist the chocolate brown paper and then cut it in half. Place one piece on top of the other and glue the edges forming a tube. Slip the tube over the head and cut and area around the face so that the hair is showing. Gather the hat about one inch from the top and tie with the juste or yarn. For the shirt, untwist the orange paper and cut in half. Glue together at one side. Gather slightly in the middle and tie with the just or yarn. Glue the shirt to the head at the neck. Using a fine tip marker draw in the face. Glue magnet to back.
This instruction sheet cover just three variations. With the basic steps presented here, and a little imagination, the possibilities are endless. Cartoon characters, animals, holiday ornaments, fruits and vegetables just to name a few.

